The start of work with Power Bi Desktop.
Start work with Power Bi Desktop
Welcome to the leadership at first work with Power Bi Desktop. This review will introduce you to the principles of work and the capabilities of Power Bi Desktop. It also shows how to create reliable data models and amazing reports to increase the effectiveness of business analytics.
To quickly get an idea of how Power Bi Desktop works, look at the screen pictures in this guide. It takes only a few minutes. For a deeper understanding, read each section, follow the instructions given in it and create your own Power Bi Desktop file for publication in the Power Bi service and joint use with other users.

You can also watch the video at first working with Power Bi Desktop and download the Excel book with a model of financial data, which can be based on video viewing.
Power Bi Desktop is updated and released on a monthly basis, including customer reviews and new functions. Only the latest version of Power Bi Desktop is supported; Clients who apply to the Power Bi Desktop support service will be invited to update to the latest version. You can get the latest version of Power Bi Desktop from the Windows store or in the form of one executable file containing all supported languages for downloading and installing on a computer.
Principles of Power Bi Desktop
The following opportunities are available with Power Bi Desktop.
- connection to data, including many data sources;
- the formation of data using requests that create attractive and useful data models;
- creation of visualizations and reports using data models;
- Providing general access to reports of reports to other users who can work with these files, supplement them and share them further. Power Bi Desktop files in format PBIX They can be jointly used as any other files, but the most effective way is to send them to the Power Bi service.
The Power Bi Desktop integrates a proven query processing subsystem, data modeling system and visualization technology. Data analysis specialists and other users can create collections of requests, data, models and reports that can easily be used together with other users. Thanks to the combination of the Power Bi Desktop and Power Bi service, it becomes much easier to model, build, jointly use and expand new ideas from the data in the world.
Power Bi Desktop centralizes, simplifies and accelerates that otherwise it could be a scattered, disordered and rather complicated process of designing and creating repositories and reports of business analytics. Ready to try? Let's start.
For data and reports that should remain in the local environment, there is a separate specialized version of Power Bi, which is called the Power Bi report server.The Power BI report server uses a separate specialized version of Power Bi Desktop, called Power Bi Desktop for the Power Bi report server. It only works with the version of the Power Bi server. This article describes the standard version of Power Bi Desktop.
Installation and launch of Power Bi Desktop
To download Power Bi Desktop, go to the Power Bi Desktop download page and click Free download. To view download options, choose viewing options for language versions or download options.
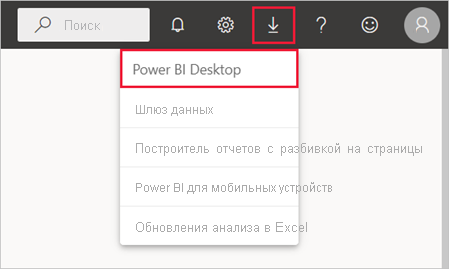
Power Bi Desktop can also be downloaded from the Power Bi service. Click the icon downloading in the top line of the menu, and then select the item Power Bi Desktop.
On the Microsoft Store page click Get And follow the instructions to install Power Bi Desktop on a computer. Launch Power Bi Desktop from the menu Start Or using a windows icon on the taskbar.
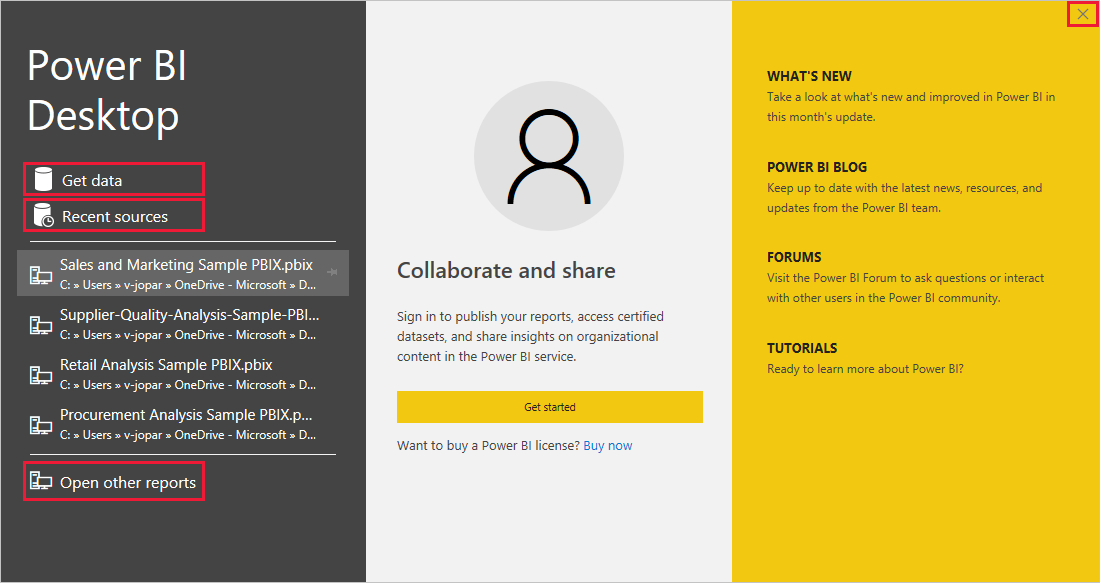
At the first launch of Power Bi Desktop, the screen is displayed Greetings.
On the screen Greetings can to get data, view The latest sources, open the latest reports, Open other reports Or choose other links. To close the screen GreetingsClick the closure icon.
On the left edge of the Power Bi Desktop window there are icons for choosing one of the three Power Bi Desktop performances: Report, Data and Model (top down). The current performance is indicated by the yellow strip to the left of the icon. To change the performance, click another icon.
If you use navigation using keys, press Ctrl+F6 to move the focus to these buttons in the window. Additional information about special capabilities and Power BI see the articles on special capabilities.
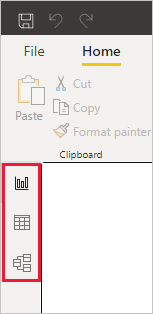
The default is chosen Report.
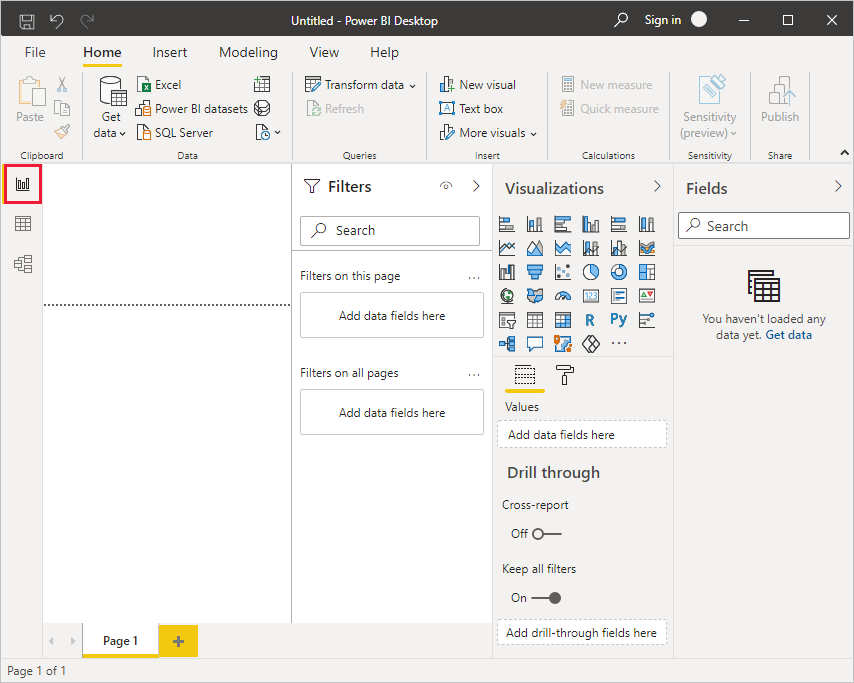
Power Bi Desktop also has Power Query editorwhich opens in a separate window. AT Power Query editor You can create requests and transform data, and then upload the updated data models to Power Bi Desktop to create reports.
Data connection
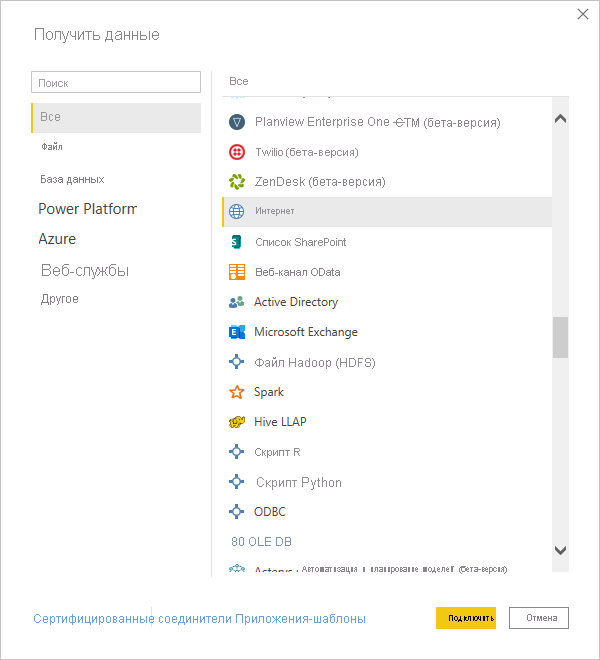
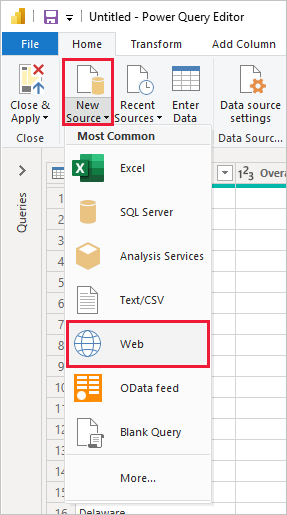
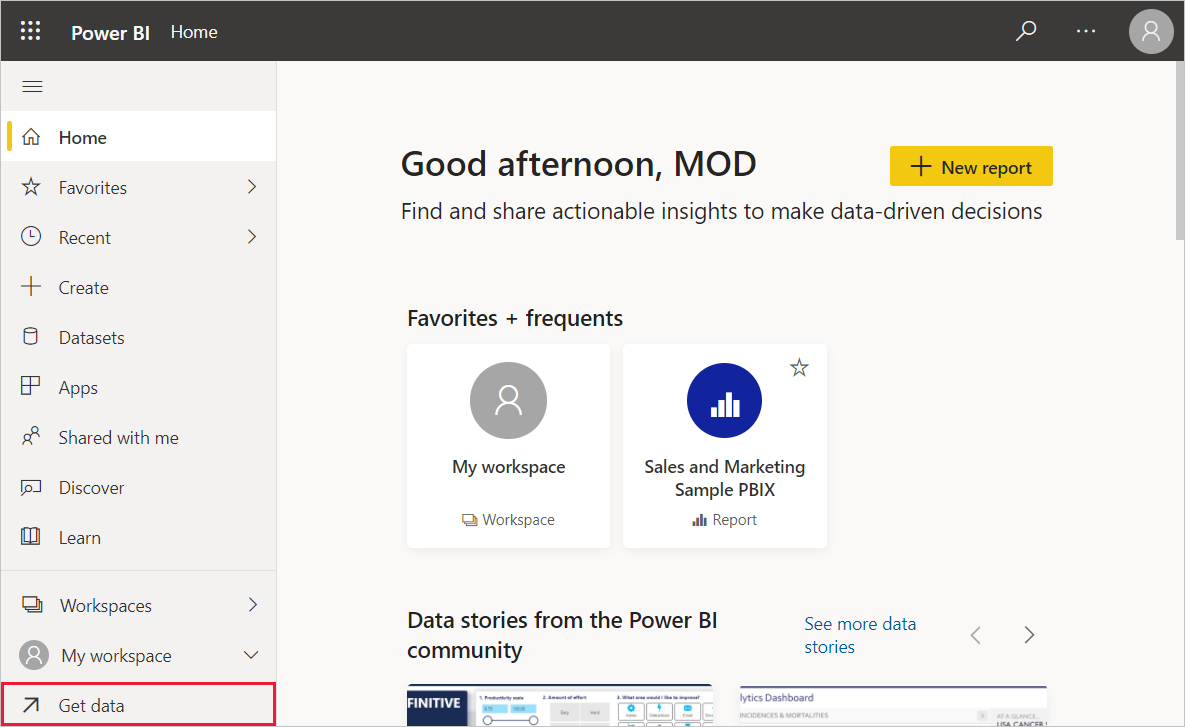
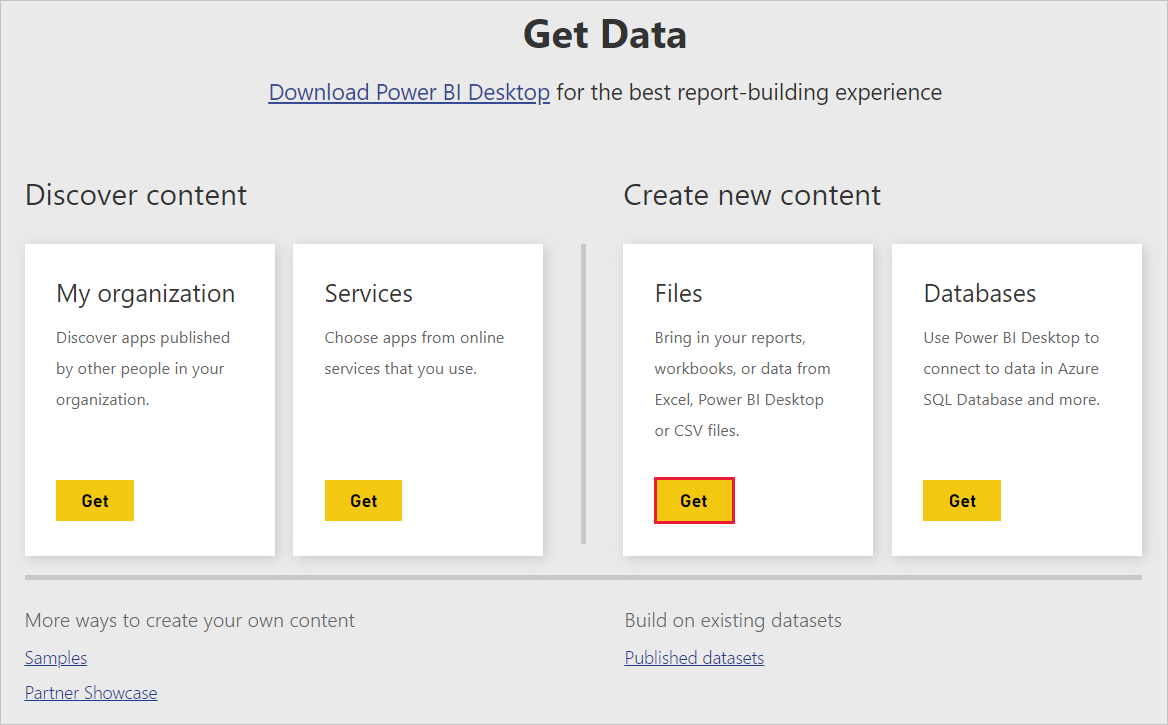
After installing Power Bi Desktop, you are ready to connect to a continuously expanding data environment. To view available types of data sources on the tab The main page In Power Bi Desktop, select To get data>Additionally, and then in the window To get data Scroll through the list All. In this brief review, you will connect to several different sources of data in Internet.
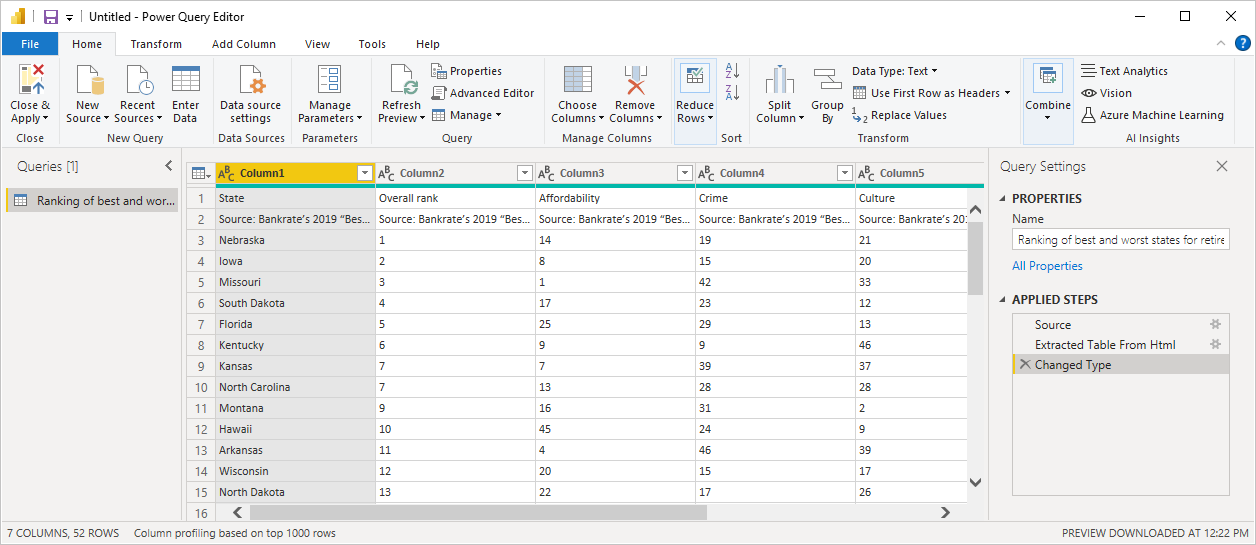
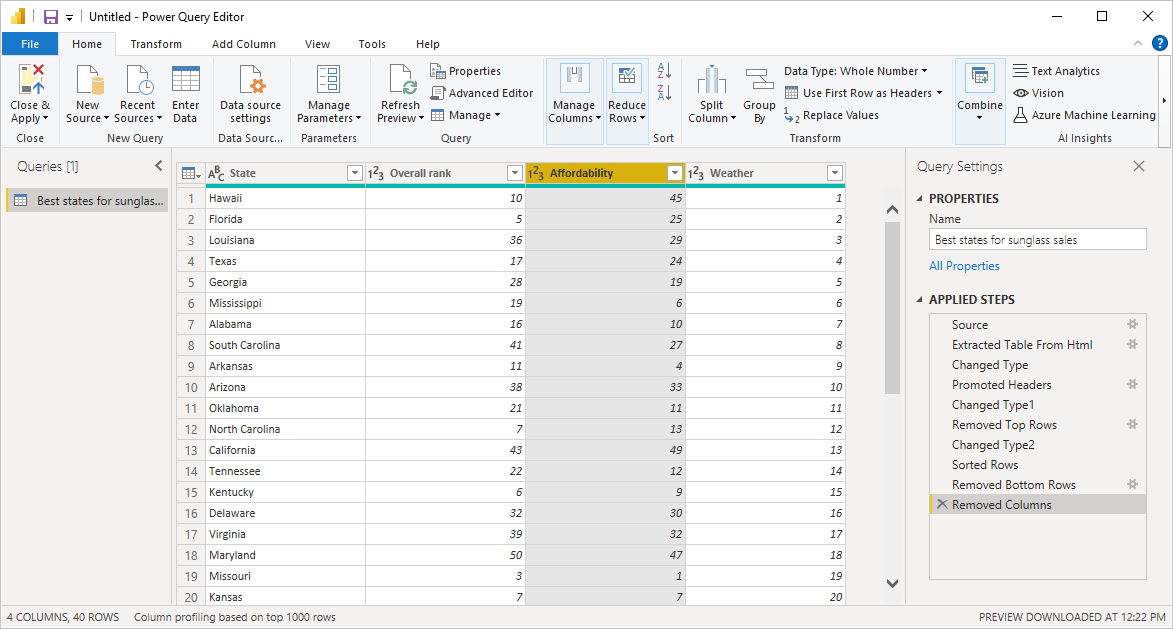
Imagine that you are working as a data analysis specialist in a company engaged in retail sales of sunglasses. You want to help the company organize targeted implementation where the sun shines more. On the Bankrate.com website on the Best and Worst States for Retirement (the best and worst states for pensioners) there is interesting data on this topic.
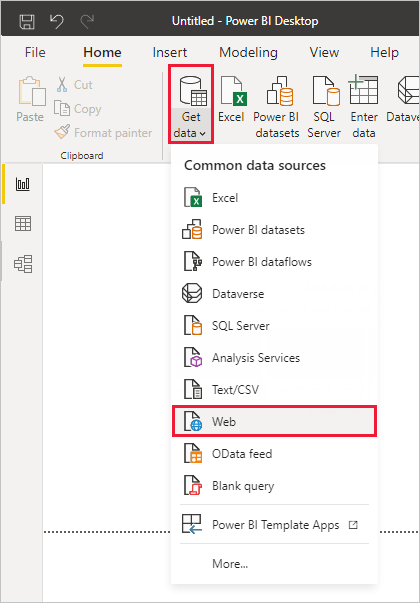
In Power Bi Desktop on the tab The main page Choose To get data>InternetTo connect to the data source on the Internet.
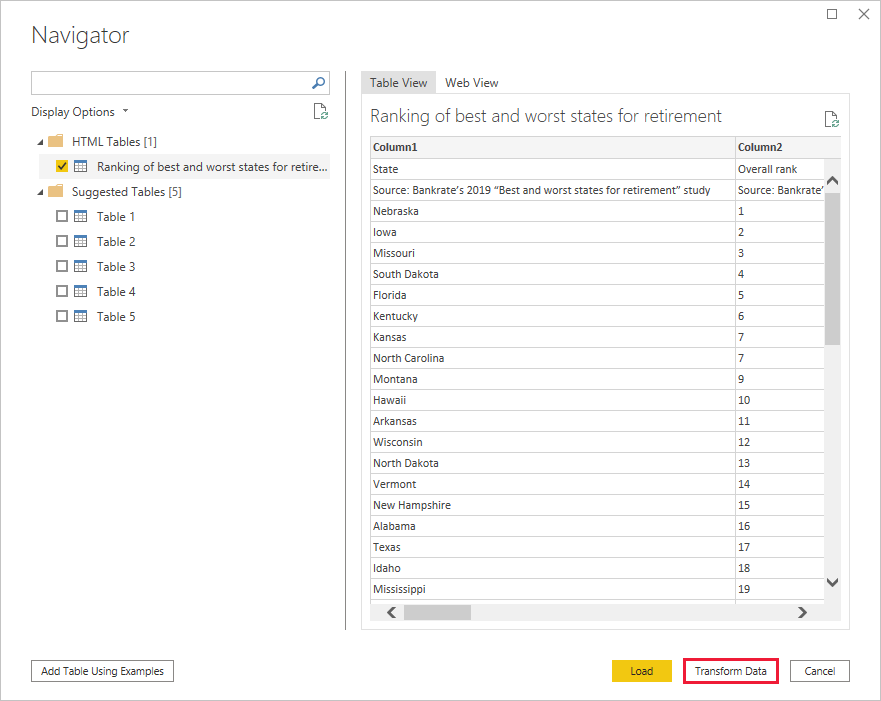
In the dialog box From the Internet Insert the address https://www.bankrate.com/retirement/best-and-worst-states-for-retirement/ in field URL address and press button OK".

When a request on the screen appears Access to the web consumer Press the button ConnectionTo use anonymous access.
The Power Bi Desktop request function is activated and will turn to the web resource. In the window Navigator Found on a web page is displayed. In this case, this is HTML table Ranking of Best and Worst States for Retirement (Rating of the best and worst states for pensioners) and five other recommended tables. You are interested in the HTML table, so select it to make pre-viewing.
At this stage, you can click the button Downloadto download the table, or button Transform datato make changes to the table before loading it.
If you press the button Transform data, Power Query editor with the presentation of the table will start. On the right is the region Request parameters. So that it is displayed constantly, in the Power Query editor on the tab View Press the button Request parameters.
Additional information about the data connection, see the article connection to the data in Power Bi Desktop.
Data formation
Now that you have connected to the data source, you can configure the data in the right way. For formation The data in the Power Query editor indicates step -by -step instructions for setting data as they are loading and displaying in the editor. This does not affect the source source of data, but only on this specific idea.
The tabular data used in this manual may change over time. Therefore, the actions that need to be performed may differ, and you will need to creatively approach the setting of steps or results. Dare, because this makes the learning process exciting.
Formation can mean Transformation data, for example, renaming columns or tables, deleting strings or columns or changing data types. In the Power Query editor, these actions are recorded in turn in the section Applied steps areas Request parameters. These actions are performed every time the request is connected to the data source so that the data is always set by you. This happens when you use a request at Power Bi Desktop or when someone else uses your request open for general access, for example, in the Power Bi service.
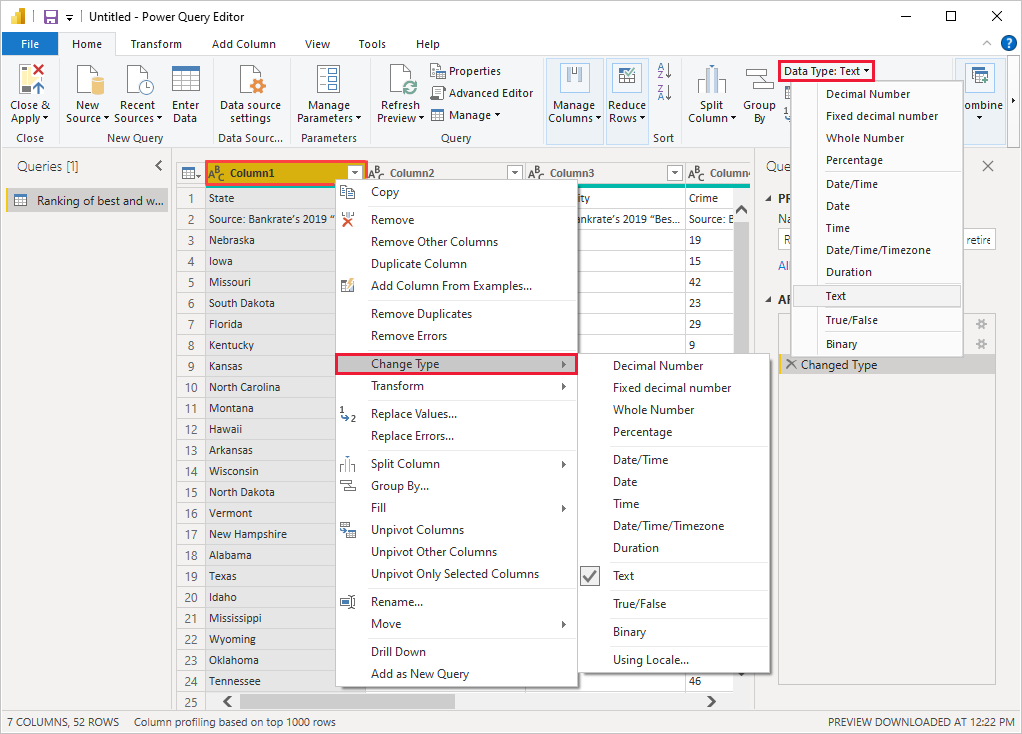
Please note that in the section Applied steps areas Request parameters There are already several actions. You can choose each of them and see how it will affect the Power Query editor. First you indicated a web source, and then looked at the table in the window Navigator. At the third step (Changed type) the Power Bi application recognized the imported data as integer and automatically changed the initial Type of dataText on the Integer.
If you need to change the data type, select the desired column or column. To choose a few adjacent columns, hold the key pressed Shift. To choose non -lane columns, hold the key pressed Ctrl. Click the header of the column with the right mouse button, select the item Type of change and select a new type of data in the menu or open the opening list Type of data in a group Transformation On the tab The main page And select a new type of data.
Available tasks in the Power Query editor in Power Bi Desktop are selected on the tape or in contextual menu. Almost all the actions that can be selected on the tabs The main page and Transformation, are also available in the context menu that appears if you click the element with the right mouse button.
Now you can apply your own changes and transformations to data and see them in the section Applied steps.
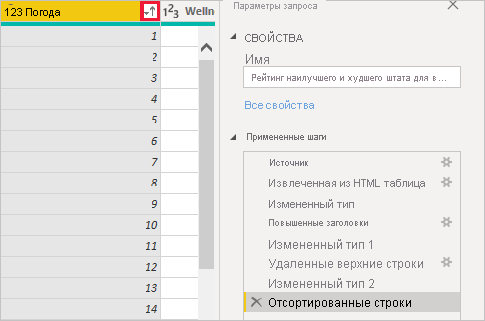
For example, for sales of sunglasses, the weather rating is most important, so you decide to sort the table by the column Weather (Weather), not Overall Rank (General rating). Click the arrow of the opening list next to the heading Weather And select the item Sort Ascending. Now the data will be sorted according to the weather rating, and in the section Applied steps The action will appear Sorted lines.
It does not make much sense to sell sunglasses in the States with the worst climate, so you decide to remove them from the table. On the tab The main page Choose Reduce lines>Remove the lines>Remove the lower lines. In the dialog box Remove the lower lines enter the number 10 And press the button OK.
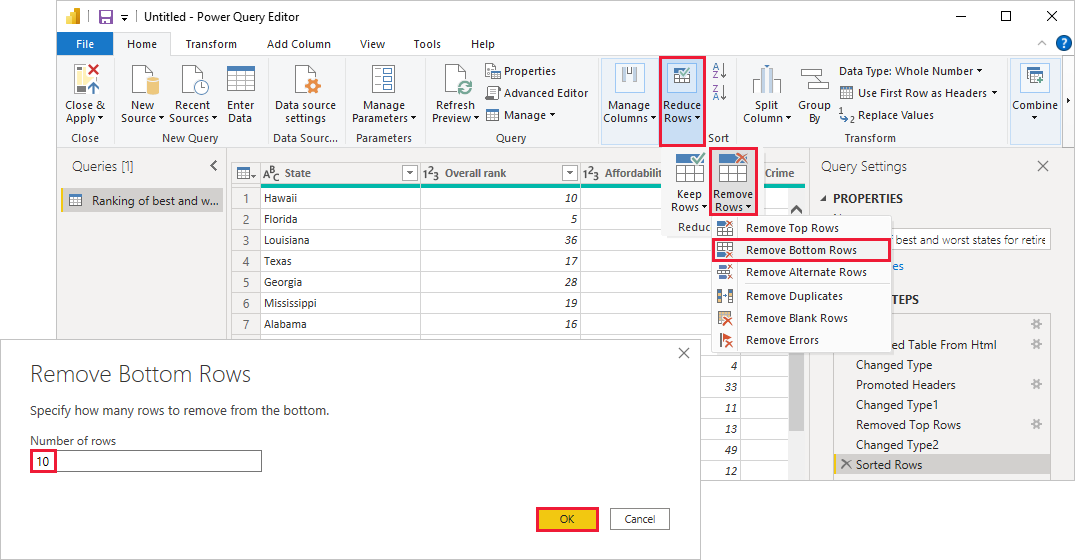
10 lower lines corresponding to the states with the worst climate are removed from the table, and in the section Applied steps The action will appear Remote lower lines.
You think that the table has a lot of extra information, so you decide to remove columns Affordability (Price level), CRIME (Crime), Culture (Culture) and Wellness (Health). Select the title of each column that must be removed. To choose a few adjacent columns, hold the key pressed Shift. To choose non -lane columns, hold the key pressed Ctrl.
Then on the tab The main page in a group Column management Press the button Remove columns. You can also click with the right mouse button one of the selected column headings and select item in the menu Remove columns. The selected columns will be removed, and in the section Applied steps The action will appear Remote columns.
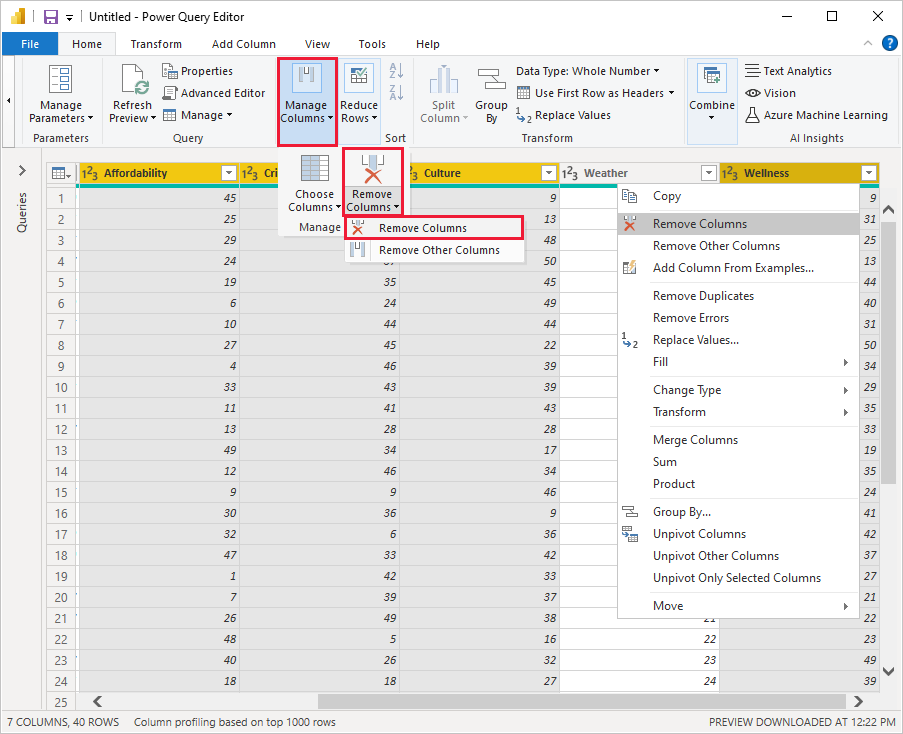
After some time, the idea that the column Affordability (Price level) may be important for sailing glasses. You want to return it. Last action in the section Applied steps can be easily canceled by clicking the removal icon next to it X. Now repeat the action by choosing only those columns that are not needed. For greater flexibility, each column can be removed separately.
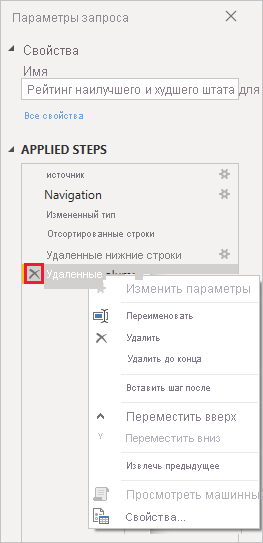
Any action in the section Applied steps You can click with the right mouse button to remove it, rename, move up or down in the list or add or remove steps after it. In the case of intermediate actions in Power Bi Desktop there will be a warning that the change can affect subsequent actions and disrupt the request.
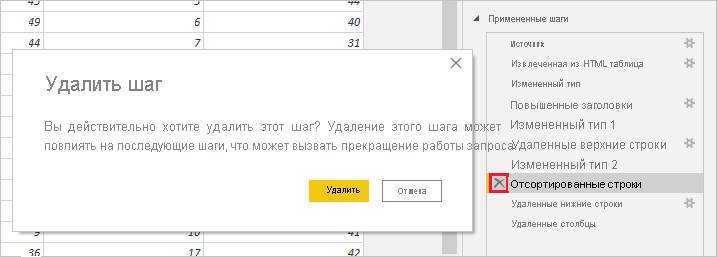
For example, if the table no longer needs to be sorted by the column Weather, you can try to remove the action Sorted rows. Power BI Desktop will issue a warning that deleting this action may cause the query to fail. You deleted the bottom 10 rows after sorting on the Weather column, so different rows will be deleted when the sort is unsorted. A warning will also appear if you select an action Sorted rows and try to add an intermediate action instead.
Finally, the heading of the table needs to be changed to refer to sales of sunglasses rather than conditions for retirees. In area Request parameters In chapter Properties replace title with Top States for Sunglasses Sales.
The completed request will look like this:
For more information about data styling, see Shape and combine data in Power BI Desktop.
Data aggregation
This data on various states is of interest and will be used to create additional analyzes and queries. However, there is one problem: most of the data here does not use the full name of the state, but its two-letter code. To use this data, you need to link the state names to their state codes in some way.
Fortunately, there is another public data source that does just that, but the data will require a fair amount of shaping before it can be unite them with a table.
To import state codes into Power Query Editor, on the tab Main page ribbons in a group New request select Create source>Internet.
In the dialog box From the Internet enter the URL for the abbreviated states site: https://en.wikipedia.org/wiki/List_of_U.S._state_abbreviations.
In the window Navigator select table Codes and abbreviations for U.S. states, federal districts, territories, and other regions (Codes and abbreviations for US states, federal districts, territories, and other regions) and press the button OK. The table will open in the Power Query Editor.
Delete all columns except Name and status of region (Name and status of the region), Name and status of region (Name and status of the region) and ANSI. To keep only these columns, select them by holding down the key CTRL. Then right-click on the heading of one of the columns and select Delete other columns or on the tab Main page in a group Column management select a team Delete other columns.
Click the dropdown arrow next to the heading Name and status of region_1 (Region name and status_1) and select Filters>Equals. In the dialog box Row filtering open the dropdown Enter or select a value next to the field equals and select the item State (State). Click OK.
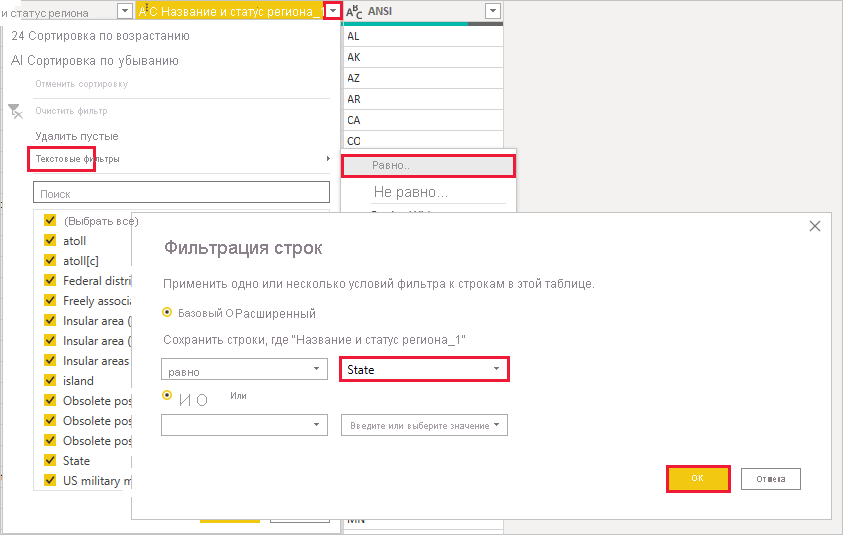
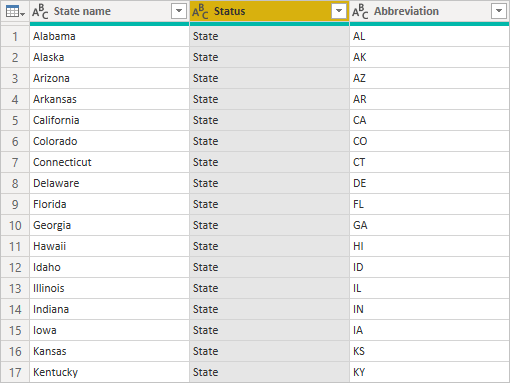
After removing redundant values such as federal district (Federal District) and island (island), you will get a list of 50 states with their official two-letter abbreviations. To make the column headings clearer, you can rename them, for example State name, Status and Reduction. To do this, click the header with the right mouse button and select the command Rename.
Please note that all these actions are recorded in the section Applied steps areas Request parameters.
The formed table now looks like this:
Rename the table c States codes in field Properties areas Request parameters.
Now that you have formed a table States codes, can Combine Two tables in one. Since the obtained tables are the result of execution of data requests, they are also called requests. There are two main ways to combine queries: Mergers and addition.
When there are one or more columns that you want to add to another request, you Drink Requests. If there are additional lines of data that must be added to the existing request, is executed addition Request.
In this case, it is necessary to perform Mergers Request States codes With a request The best states for sales of sunglasses. To do this, go to the request The best states for sales of sunglasses, choosing it in the area Requests On the left side of the editor Power Query. Then on the tab The main page ribbons in the group Combine Select the team Combine requests.
In the window Mergers In the field with an opening list, select a request States codes. Select the columns that need to be compared between the tables. In this case, this is a column State (State) from request The best states for sales of sunglasses and column Name of the state From the request States codes.
If a dialog box appears Privacy levelsSet the flag Skip checks of confidentiality levels for this file And press the button Save. Click OK.
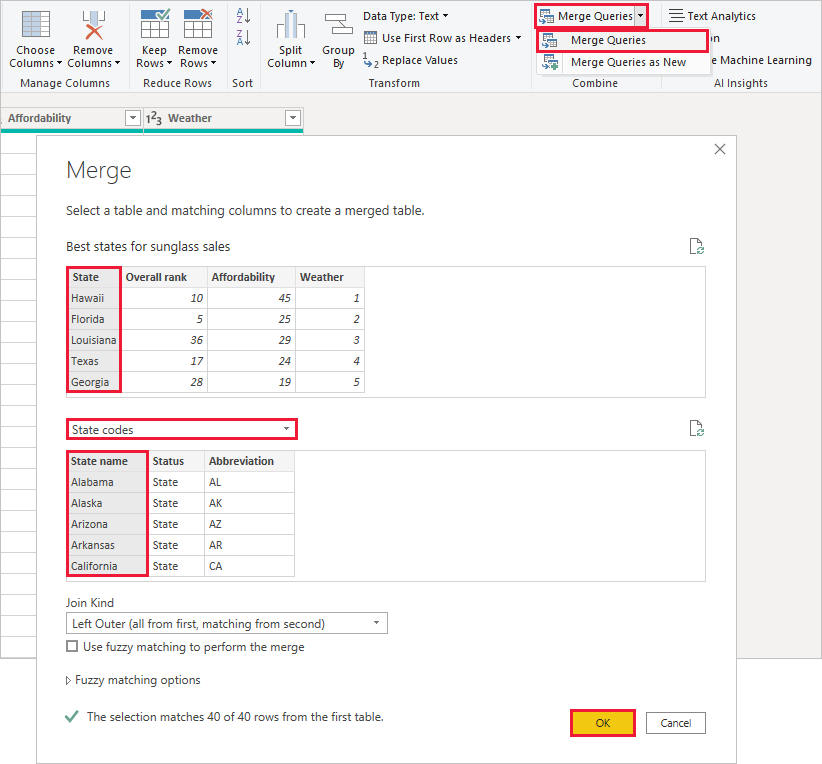
On the right side of the table The best states for sales of sunglasses A new column will appear States codes. It contains a request States Codes, which was united by a merger with the request The Best States for Sun Suns. All columns from a combined request are collected in a column States codes. You can expand The combined table and enable only the necessary columns.
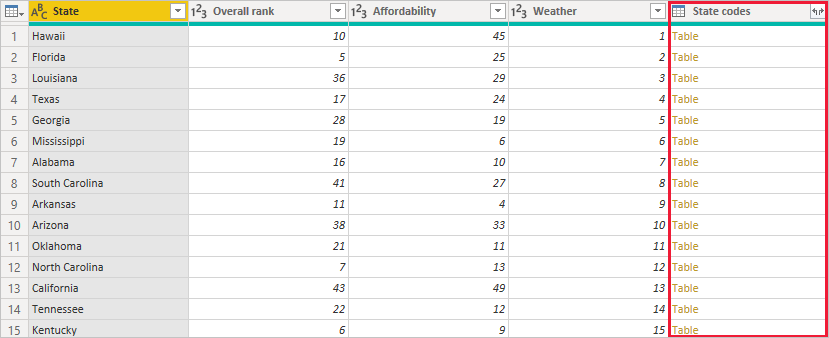
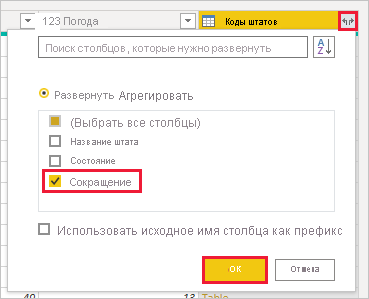
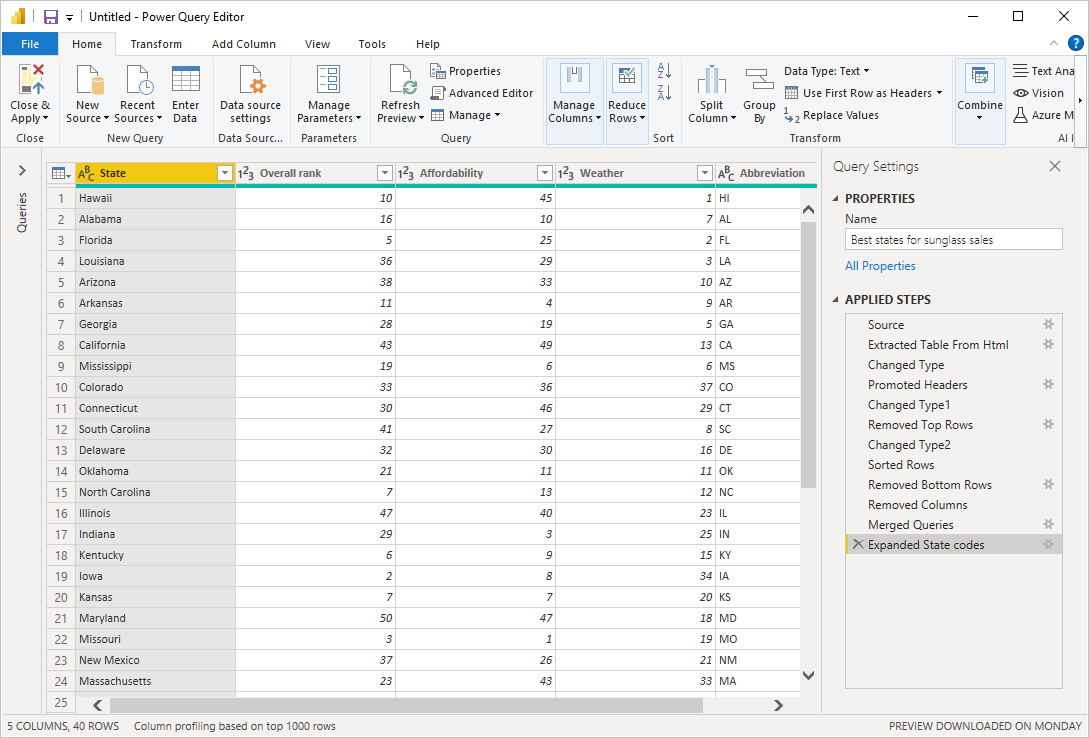
To expand the combined table and select columns to turn on, click the icon deployment In the heading of the column. In the dialog box deployment Select only a column Reduction. Remove the flag Use the original column name as a prefixthen click the button OK.
You can test different ways to add table States codes. Experiment a little, and if you are not satisfied with the result, just remove the corresponding step from the list Applied steps in area Request parameters. This can be repeated as much as you like, until the deployment process will happen as it should.
A detailed description of the actions on the formation and combination of data see.The article Formation and Unification of Data in Power Bi Desktop.
Now you have one request (table) that combines two data sources, each of which is formed as you need. This request can serve as the basis for a large number of additional connections to the data of the data, such as demographic data, the level of well -being or recreational capabilities in different states.
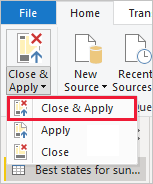
Now you have enough data to create an interesting report on Power Bi Desktop. Since this is a milestone, apply changes in Power Query editor and download them to Power Bi Desktop by clicking button Close Apply On the tab HomeRibbons. You can also choose a command ApplyTo leave the request open to the Power Query editor while working in Power Bi Desktop.
After loading the table in Power Bi Desktop, you can make additional changes and restart the model to apply them. To open it again Power Query editor From Power Bi Desktop, select Transform dataOn the tab HomePower Bi Desktop.
Creation of reports
In the view Report In Power Bi Desktop you can create visualizations and reports. Performance Report Contains six main areas.
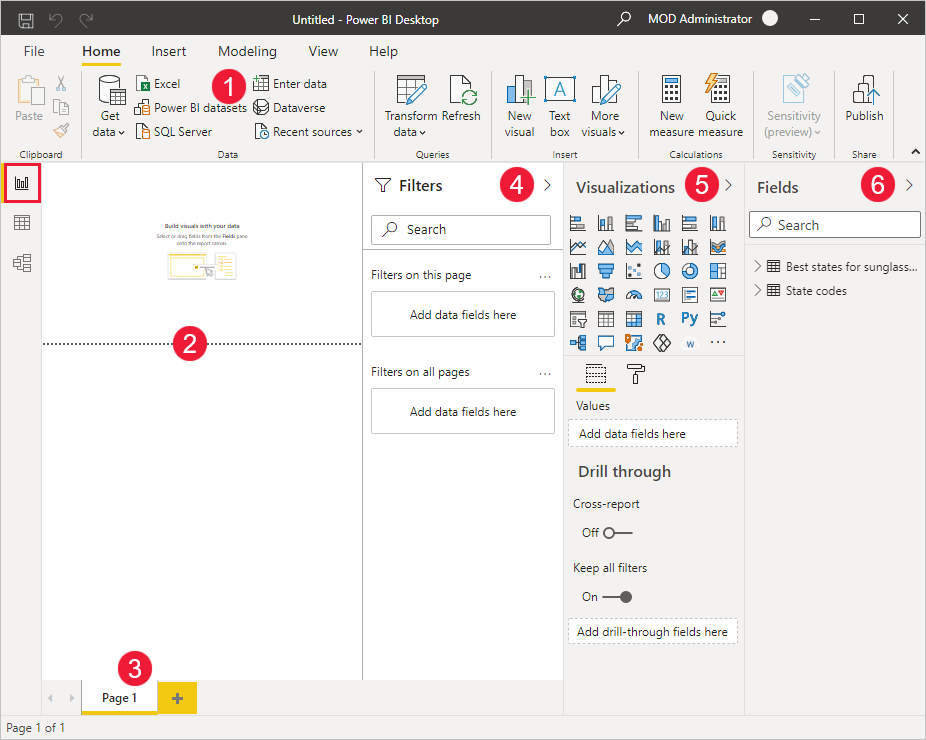
- The tape at the top of the window, on which the general tasks related to reports and visualizations are displayed.
- The canvas area in the middle of the window where visualizations are created and organized.
- The area of the page tabs in the lower part, where you can choose or add the pages of the report.
- Region Filtersin which you can filter data visualization.
- Region Visualization where you can add, change or configure visualizations, as well as apply details.
- Region Fieldsin which the fields available in the requests are presented. These fields can be dragged to the canvas, to the area Filters or area Visualizationto create or change visualizations.
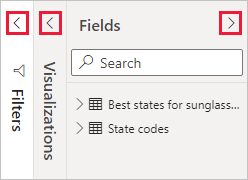
Areas Filters, Visualization and Fields You can deploy and curtail with an arrow at the top of each area. By curling the panel, you can get more space on canvas to develop visualizations.
To create simple visualization, just select any field in the field list or drag the field from the list Fields to the canvas. For example, drag the field State (State) from request Best States for Sunglass Sales (The best states for sales of sunglasses) and see what will happen.

As you can see, the Power Bi Desktop application recognized that the field State Contains data on geographical, and automatically created a visualization based on the card. It shows data points for 40 states from the data model.
In area Visualization Information about visualization is presented, and you can change it.
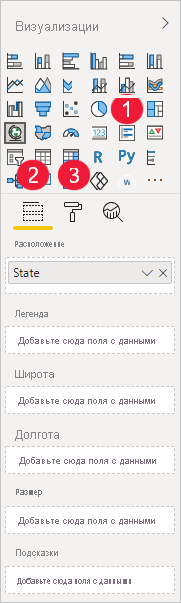
- The icon indicates the type of visualization created. You can change the type of visualization by choosing another icon, or create a new visualization by clicking the icon when visualization is not selected.
- Tab Fields in area Visualization allows you to drag the fields with data in Conditions and other field containers in the area.
- Tab Format allows you to apply formatting and other controls to visualizations.
Items available on tabs fields and Format, depend on the type of visualization and data.
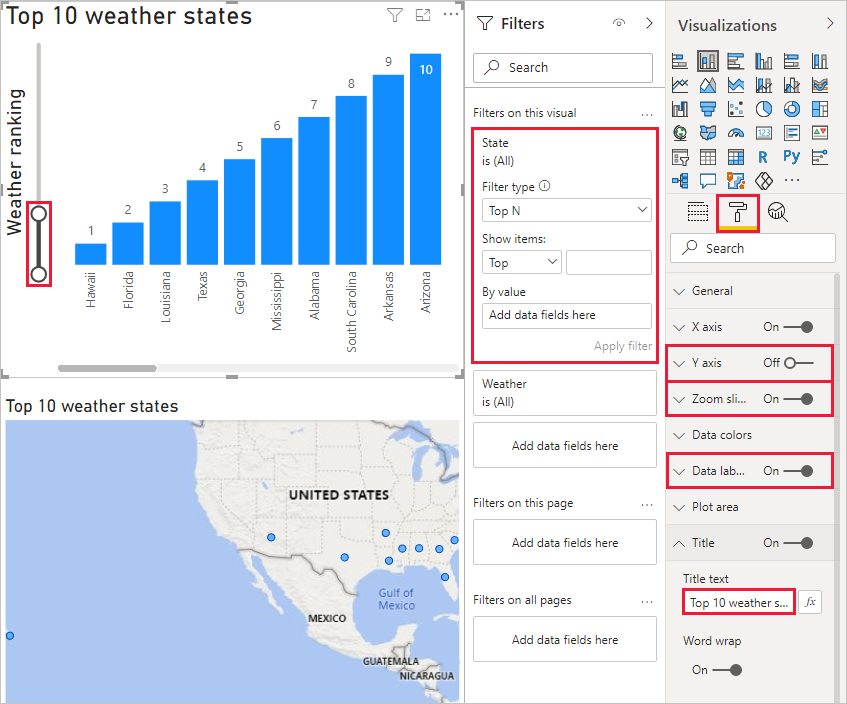
You want the map to show only the top 10 states by climate rating. To display only the first 10 states, in the area Filters hover your mouse over the field State (all) and click the arrow that appears. Drop Filter type select item Leading N. In chapter Show elements select item Bottom, because you want to show the items with the lowest numeric rating, and then in the next field, enter a number 10.
Drag box Weather from the region fields in field By value and click Apply filter.
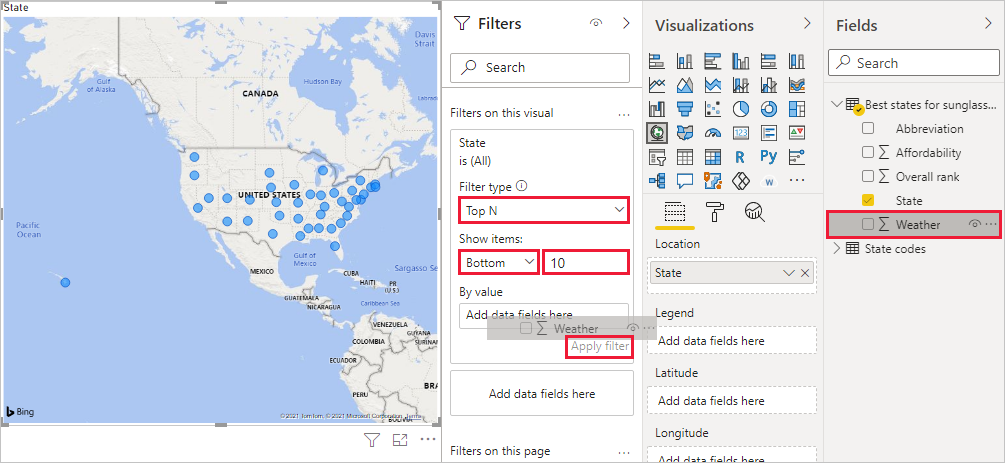
Now only the top 10 states by climate rating are visible on the map.
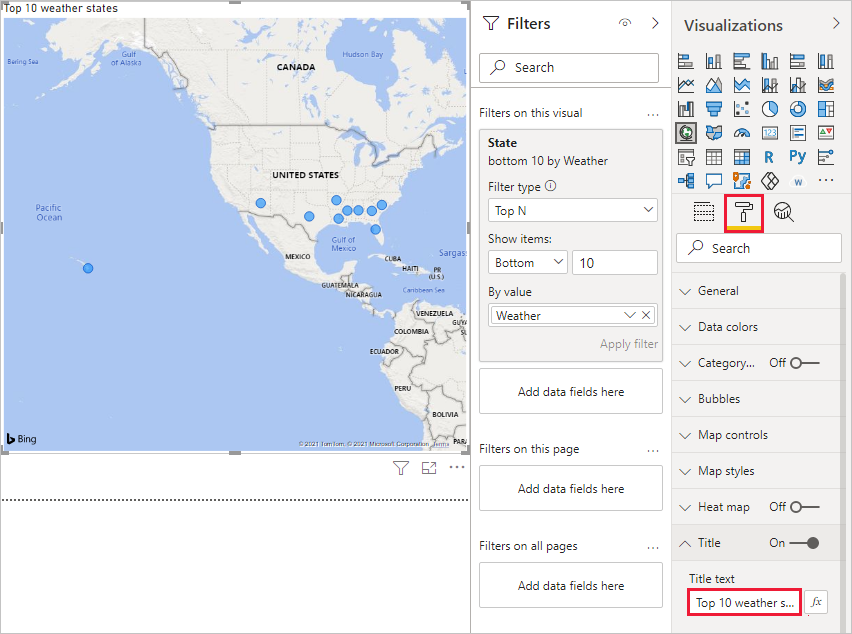
Change the name of the visualization by clicking the icon Format in area Visualizationsby selecting an element Name and entering in the field Title text text Top 10 states by climate.
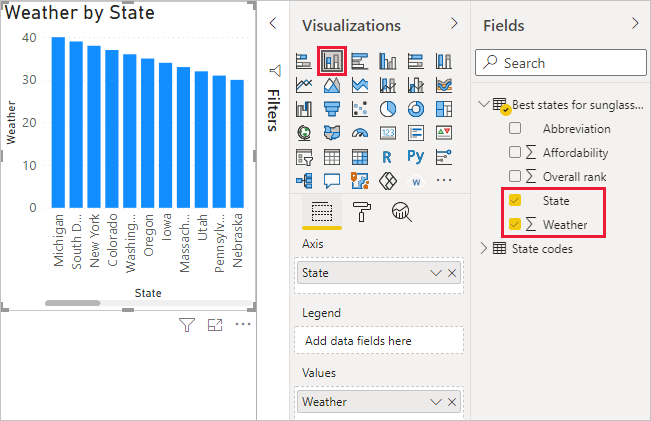
To add a visualization that displays the names of the top 10 states by climate rating and their ranking from 1 to 10, select an empty spot on the canvas, and then in the area Visualizations click icon bar graph. In area fields select fields State and Weather. The bar chart displays 40 states from the query, sorted by numerical rating in descending order, that is, from worst climate to best.
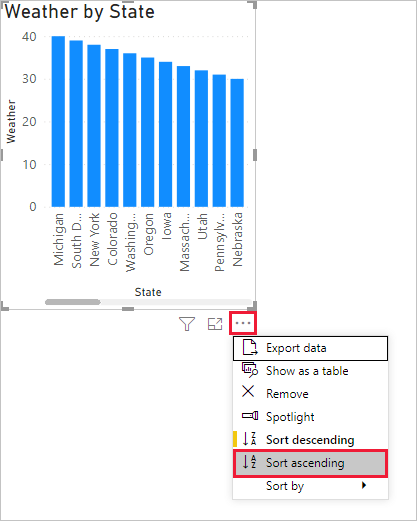
To change the order of the states so that the state ranked 1 comes first, click the Extra options in the form of an ellipsis in the upper right corner of the visualization, and then select the menu item Sort Ascending.
To keep only the first 10 states on the histogram, apply the same filter as on the map.
Rename the histogram the same as the map. In addition, on the tab Format areas Visualizations change the parameter value Y-axis>Axis Title with Weather to a more understandable one: climate rating. Then set the selector Y axis into position Off. Install zoom slider into position On and Data Labels into position On. Finally, adjust the zoom slider along the y-axis so that the stacked bars fill the chart.
The top 10 states with the best climates are now displayed in order, along with numerical rankings.
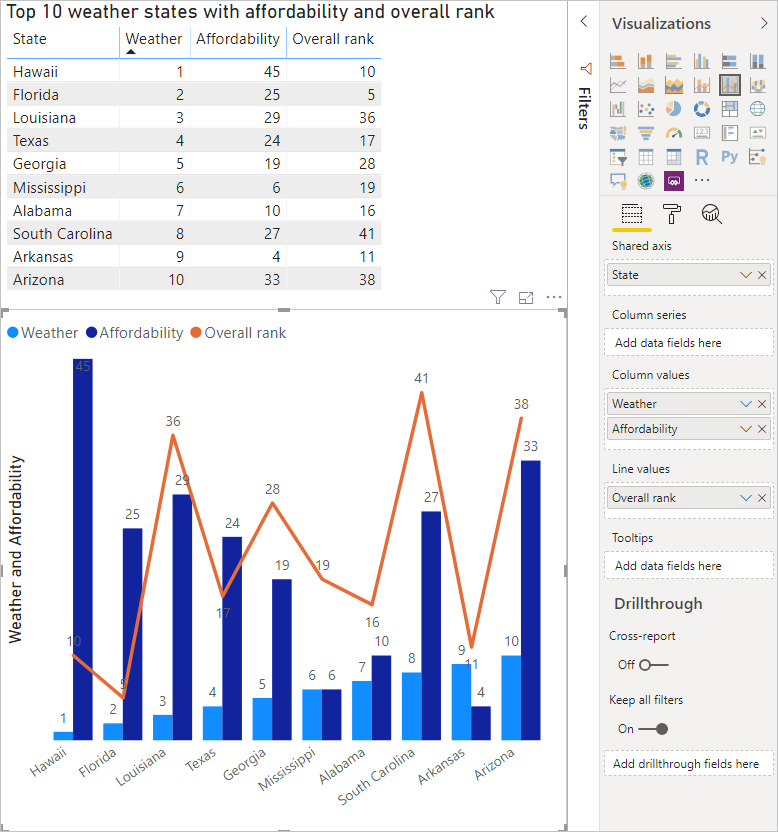
You can create similar or different visualizations for fields Affordability and overall ranking or combine multiple fields into one visualization. There are all kinds of interesting reports and visualizations that you can create. On these visualizations like Table and Graph and histogram with grouping showing the top 10 climate ranking states along with price levels and overall rankings:
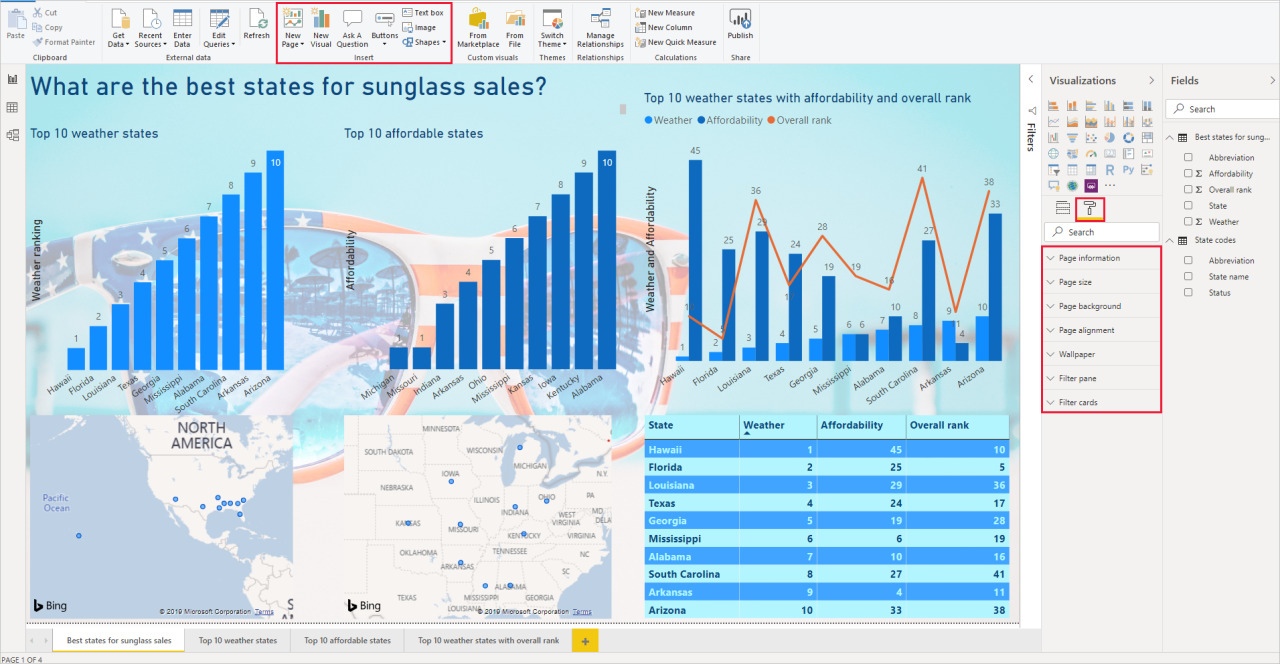
You can use different visualizations on different report pages. To add a page, click the symbol + next to the available pages in the page bar, or select the command Insert>Create page tab Main page ribbons. To rename a page, double-click its name in the Pages row, or right-click the name and choose Rename Page, and then enter a new name. To go to another report page, select it in the page row.

From the group Insert tab Main page You can add text boxes, images, and buttons to report pages. To set formatting options for a visualization, select it, and then in the Visualizations click icon Format. To customize the size, background, and other page settings, click the icon Formatwhen visualization is not selected.
When you have finished creating pages and visualizations, select File>Save and save the report.
For more information about reports, see Report view in Power BI Desktop.
Sharing work
Now that you have a Power BI Desktop report, you can share it with others. This can be done in several ways. You can distribute the file PBIX report like any other file, send the file PBIX from the Power BI service, or publish the report directly from Power BI Desktop to the Power BI service. You need a Power BI account to publish reports to or upload reports to the Power BI service.
To publish to a service Power BI from Power BI Desktop, on the tab Main page ribbon click Publish.

You may be prompted to sign in to Power BI or select a destination.
When the publishing process is complete, the following dialog box will be displayed:
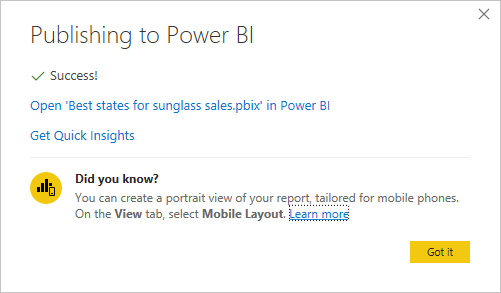
After you click the link to open the report in Power BI, it will open in your Power BI site under My workspace>Reports.
You can also download your work from the service to share your work. Power BI . Go to opening https://app.powerbi.com Power BI in the browser. On the page home Power BI click To get data in the bottom left corner to start the Power BI Desktop report download process.
On the next page select Get In chapter Files.
On the next page select local file. select a file PBIX Power BI Desktop and click Open.
When the file is imported, it will appear in the section My workspace>Reports in the left pane of the Power BI service.
If you select a file, the first page of the report appears. You can select other pages using the tabs on the left side of the report.
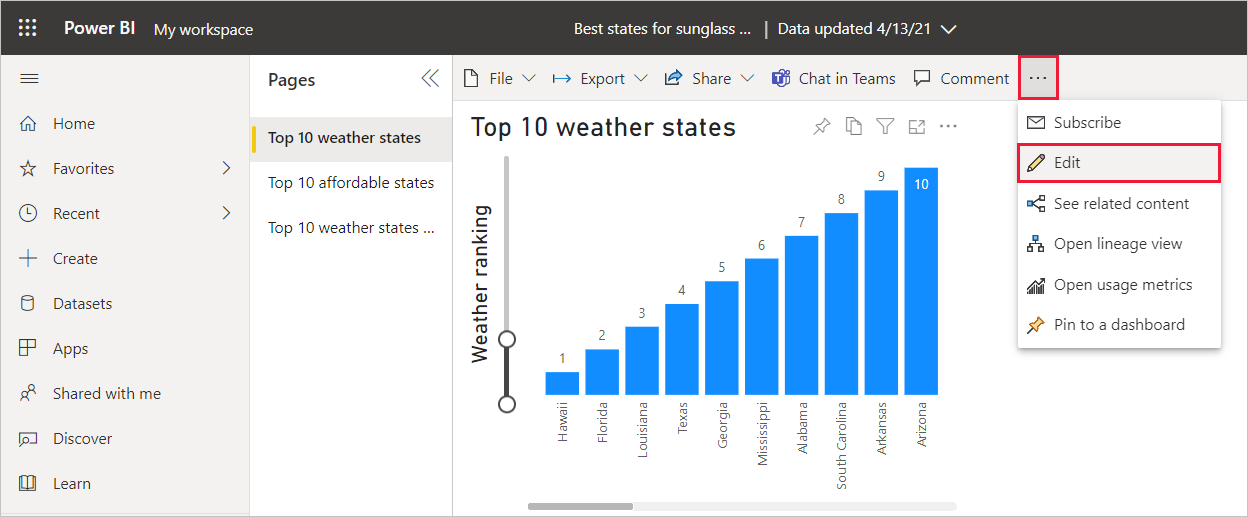
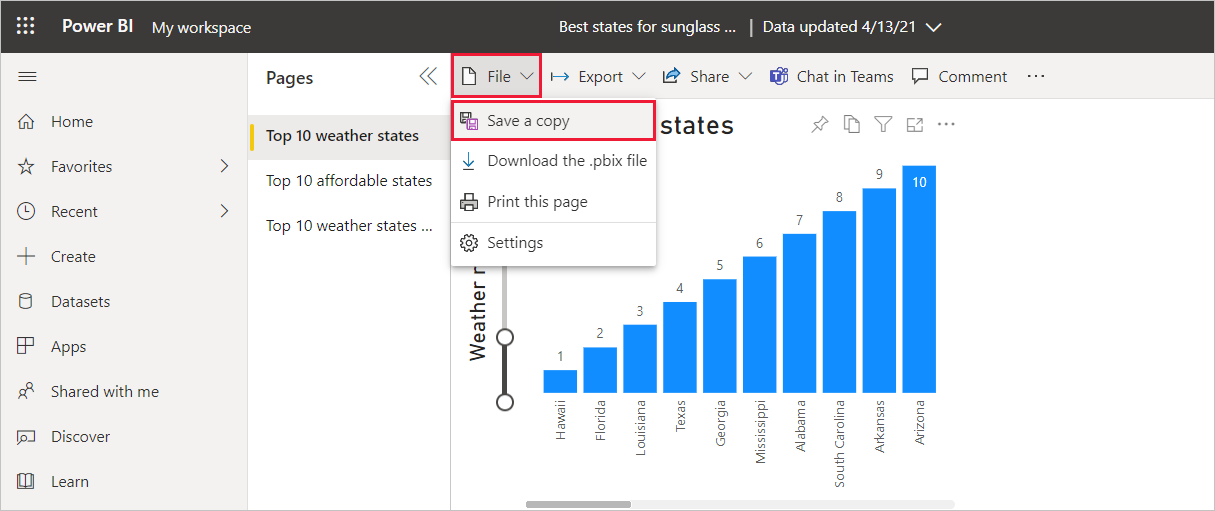
To make changes to a report in a service Power BI, at the top of the report canvas, select Extra options>Change.
To save your changes, click File>Save a copy.
In a service report Power BI you can create any visual elements, and then attach them to dashboards. Learn more about dashboards in the service Power BI see design guidelines for the perfect dashboard.For more information about creating, editing, and sharing dashboards, see Sharing a Dashboard.
To share a report or dashboard, click General access>report at the top of an open report page or dashboard, or click General access next to the report or dashboard name in the list My workspace>Reports or My workspace>Dashboards.
Perform the necessary actions on the screen Report Sharing or Sharing a Dashboardto send an email message or get a link that allows you to share your report or dashboard with others.

With Power BI Desktop and the Power BI service, you can create many impressive mashups and data-driven visualizations.
Further actions
Power BI Desktop supports connecting to the diagnostics port. This port allows other tools to connect to perform diagnostic tracing. When using the diagnostic port making changes to the model is not supported. Model changes can lead to data corruption and loss.
To learn more about the many features of Power BI Desktop, see the following resources: